Carving is the ultimate skiing, the essence of the current ski technique, and the passion
of groomer lovers. The tiramisu of on-piste skiing, the art form everybody wants to achieve, the holy grail… “Feel the sensation of the edges biting and catapulting you around the corner and you’ll spend the rest of your life earning to pay for ski holidays”.
Carving has become synonymous with great skiing; it’s how world cup racers ski, and it creates some of the most memorable and exciting moments as you are arcing from side to side.
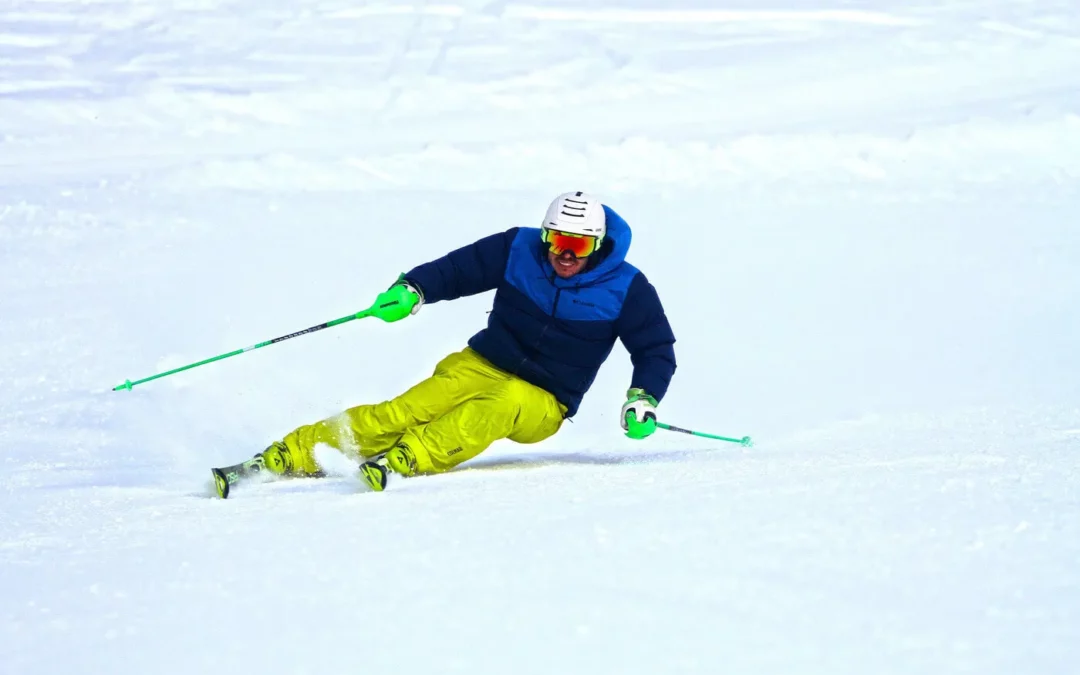
Specifically, it’s the technique of turning by just tipping the skis onto its edges. Carving is when the path on the snow of the ski tip and tail are the same. Carving is where the edges cut into the snow so well that the skis do not slide sideways, and travel straight along their length. Once the ski is tipped in and the edges engage or lock, the ski will cut and slice forward through the whole arc. A carving ski will leave a clear, thin track in the snow and when both skis are carving you will leave two paths in the snow like railway tracks. Carving is the cleanest of the turns that we make. There is absolute edge engagement (edge lock) throughout the turn. Any active steering or pivoting of the skis will disengage the edges, resulting in skidding.
When edged, the sidecut geometry causes the ski to bend into an arc, and the it naturally follows this arc shape to produce a turning motion. The carve is efficient in allowing the skier to maintain speed because the skis don’t create drag (no sliding sideways involved).
A carving ski will move faster and build more pressure, so you feel higher g-forces than in any other type of turn, which is why it’s the best technique for racing. It is also why it feels so good!
Centripetal force increases relative to the edge angle and speed of travel, so carved turns have more forces than skidded ones.
It is worth mentioning that G-forces or “Centrigugal force” is not a true force in the strict sense, but instead it is used to describe the sensation of being pulled toward the outside of a turn. What actually is being felt is the tendency for a rotating body to go straight (tangent) if the forces causing the turn end. It’s called tangential inertia.
When tipped on edge, the ski bends because of its “hourglass” shape. If you take one ski, lay it over flat, and then tip it, you’ll see that only the tips and tails touch the ground/snow, and the middle part of the ski is “in the air”. With the skier’s weight, the ski bends until this middle part (or “waist”) reaches the snow too. The higher the edge angle, the higher the amount of ski bending, and the tighter the turn radius.

As you can see in the diagram above, to make turns with a shorter radius than the designed radius of the ski, you need to perform rotary/steering movements. To make turns that are more open and have a longer radius than the designed radius of the ski, you have to skid as well, but at a very slow rate.
Carving is mandatory in racing because it’s the fastest way down a course. It’s important to mention that only 10% of all recreational skiers can carve a turn. That’s why it’s been said that:
“the best recreational skiers are (or were) racers, and all racers are excellent recreational skiers”.
Advantages of carving
- More efficient
- More silent and smoother (skidding is louder and rougher)
- More stable way to ski (particularly at high speeds and irregular
slopes). Skidded turns skiing fast on uneven or irregular surface are much less stable. - Way more fun
- You can do it every day (compared to the much less frequent powder skiing)
- It is eye-catching…
Having said that, it has less speed control than a skidded turn, of course. The only way to control the speed in carving turns is through our line of descent. With complete “Capital C letter” turns, starting and finishing them across the fall line/hill. This is also know in ski racing as “Ski the slow line fast”…

In a carved turn we have a change of direction with little speed control. In a skidded turn we have a change of direction and braking at the same time. So skidding is a much more important skill than carving, and that’s why it is taught first in the skier’s progression.
Carving is a huge goal for most intermediate skiers, so here’s a guide to take you from a comfortable parallel skier to a confident carver…
And finally, when you’re on the hill trying to carve or doing any kind of turn for that matter, remember to look, listen and feel your skis on the snow. A carve turn sounds, looks, and feels very different than a pivoting turn. If you look at your tracks, a carve will leave two thin lines in the snow, a pivot will leave a skid mark, or it looks like the snow has been pushed away. A carve will sound much quieter than a pivot turn because you’re not scraping the snow off the slope. Instead, you’re digging in to the slope beneath your feet. Because you’re bending that ski, it’s going to give you energy back, which is going to help propel you out of your first turn and into your second one. And finally, a carve will feel smoother than a pivot turn because you’re not jumping and sliding down the snow.
Equipment & trails
To start learning to carve we need to use relatively short skis, with a short radius (12-14 meters) sidecut (A.K.A. big sidecut). This type of ski allows us to initiate the carve easier. As soon as we tip them on edge just a tiny bit, this type of skis quickly try to “hook” and set the edge by themselves.
A good run to start carving will generally be a gentle easy slope, quite wide, have good visibility, and be relatively smooth without bumps. To discover this completely new way to ski, we need to be in a very comfortable terrain. Thus we can concentrate on making the new movements (or should I say “lack of previous movements”) to produce a carved turn.
Step-by-step guide
It is very important to choose a very easy (almost flat) slope in which we feel completely safe and won’t develop too much speed. The key is to tip or tilt the skis on edge and avoid any rotational or pivoting actions. Focus on the sensation of the skis slicing on their edges. It will be a completely new experience for many skiers, and it’s normal to feel weird. Your first impression may be of a lack of control, like if the skis “take us for a ride” and almost turn completely by themselves. So it is key to be patient, don’t rush the turn… aim for a long turn and let the skis turn the way they dictate…
1) Edged traverse: the easiest way to experience carving is to begin from an already “edges engaged” traverse. On gentle or flat terrain from a stop and with a hip-wide stance, point your skis across the fall line, tip your skis inwards onto a low edge angle and keep them that way. Lean the upper body outwards to keep the balance over the outside ski. Look uphill to check no one is comming, and either push with poles on flats or allow skis to start tracking across the slope on a gentle pitch. Do not try to adjust the edge angle at first, just maintain balance and let the ski traverse across the slope on edge. Maintain fore/aft and lateral balance without adding turning movements. Stop. Check tracks to see if you are carving (two lines in the snow like railway tracks). Repeat and practice.
2) Carved Uphill Arcs: on easy terrain, always looking uphill first, start sliding in a traverse across the fall line. Then tip the skis on edge to engage the sidecut of the ski, and wait for them to start the turn. You will stop when the turn is complete and you start to go uphill a little. Slowly move to more pitch and point the skis a bit more downhill to add some speed to traverse/arc practice. Tip both feet/ankles/legs tip toward the hill to higher edge angles to turn more. When trying to “make the skis turn” skiers often add rotary inputs, causing the skis to skid. We don’t want that to happen now… In this activity, learn to gradually place the ski on edge and let the ski design cause the turning. Be patient, and again let the ski create the direction change. Tipping the ski up onto a higher edge angle will tighten the arc, if desired, but remeber to stay balanced on the outside ski only.
3) “J turns”: this is a more advanced version of the “carved uphill arcs”. On a gentle slope, always looking uphill first, start going straight down, get some speed, and then tip the skis on edge and carve the whole turn until you start going uphill and stop. When you stop at the other edge of the slope, then do another J turn in the opposite direction to tip the skis to the other side.
The more you tip the skis, the more you have to angulate with the upper body out, in order to stay balanced on the outside ski.
4) Rollerblade turns (AKA Railroad tracks or edge rolls): linked pure-carved arcs that leave two distinct tracks in the snow. Elongated “S” turns on the edges on very easy terrain. What you want to do is put your skis up on the smallest amount of edge possible. So start with just your ankles, put them on to their edge and see where the sidecut naturally takes the ski.
So tip in a little both skis to one side to start a turn. Then flatten the skis back and tip them to the other side to start another turn. And so on… Tipping/edging comes from legs under a stable upper body. Continuous rolling/tipping motion of both feet/ankles/legs release and then re-engage the edges simultaneously and links the one turn to the next. You will end up with very elongated “S” arcs. Also you can try this drill in a free groomed catroad, with noone behind you trying to get ahead of you. And remember, if you want to unlock your carve, you either flatten those feet or you turn your skis sideways back into that pivot.
Drills to help carve for the first time
a) Tuck or Schuss carved turns: again on a very easy run, while tucking, make some arcs. The tucking helps us to avoid rotation or pivoting of the skis (which, as we already discussed, produces a skidded turn and we don’t want that to happen now).
b) “Gorilla” turns drill: this is another great drill to experiment with carving for the first time. It is also known as the in rigger drill. To perform it, we have to open or widen the stance extremely, flex the inside leg, and balance (“wrongly” but on purpose) on a flat inside ski while we keep the outside leg long and tipped in. This helps the outside ski to engage and carve throughout the whole turn. This is one of the best exercises to learn and trust that the skis can almost “turn on their own” just by tipping them on edge.
Once you know how carving feels, start making comfortable turns to both sides, trying to increase the edge angle and/or steepness of the slope. Focus on completing the turn so you point your skis well across the fall line before you start a new turn.
It will be a completely new experience for many skiers, and it’s normal to feel weird. Your first impression may be of a “lack of control”, like if the skis “take us for a ride” and almost turn completely by themselves. So it is key to be patient, don’t rush the turn… let the skis turn the way they dictate…
Tuck or Schuss position:

Schuss: it is literally German for “a shot.”
Gorilla turns demonstrated by Italian maestro di sci Alex Favaro in Sestriere ski resort:

Common mistakes
The classic error when trying to perform a carved turn for the first time is not being patient at initiation, and rushing the turn by steering or pivoting the skis at the top, instead of just rolling them on edge. This rotation or twisting of the skis at the top of the turn does not allow the edges to engage (I.E. lock the ski onto edge) and thus carve the turn. This is because people tend to fear facing the fall line, and want to get the skis across the fall line quickly. They don’t want to pick up speed. Remember that the first half of the turn is the accelerating part. The slowing down comes on the second half of the turn, when the skis move out of the fall line. Try to be comfortable with that, it is key to allow the skis to run a bit.
Another key advice is to try to perform or look for a longer turn. Avoid aiming for a short turn. Short turns for intermediate skiers mean skidding, and here we want zero skidding whatsoever.
So the approach to carving should be that of “LESS is MORE“. Try to do less movements (than in a skidded turn), and let the skis control the situation a bit. Just balance on the new outside ski and tip the skis on edge. Do nothing more than that. Be quite passive, and even try to “keep going straight” or in the direction you were going at the end of the previuos turn as you incline (like if you would try “not to turn”, even though the skis tipped on edge and carving forward will always turn). Another advice is to let the skis continue to travel across, in the direction of the slope edge or border. And then, PATIENCE… “wait, wait, wait“. The skis will slowly start turning, almost by themselves. Just let the skis do the job… It feels a bit like they take you for a ride…
“So the approach to carving should be that of “LESS is MORE“. Try to do less movements (than in a skidded turn), and let the skis control the situation a bit. Just balance on the new outside ski and tip the skis on edge. Do nothing more than that. Be quite passive, and even try to “keep going straight” or in the direction you were going at the end of the previuos turn as you incline (like if you would try “not to turn”, even though the skis tipped on edge and carving forward will always turn). Another advice is to let the skis continue to travel across, in the direction of the slope edge or border. And then, PATIENCE… “wait, wait, wait“. The skis will slowly start turning, almost by themselves. Just let the skis do the job… It feels a bit like they take you for a ride…”
Carving in the off-piste/backcountry
Even though it is way easier to learn (and to perform) carving on an evenly groomed slope, we definitely can carve on the ungroomed terrain. Carving on “fat skis” it is the most up-to-date technique in freeride skiing, and something judges of that type of competition look for when evaluating an athlete (like in the Freeride World Tour) when doing their run. Leaving two clean railroad tracks when carving in the powder is not common, but for the most part carving turns can be performed on any type of snow and snow surface. To carve on a soft surface like powder or spring snow we need to be less aggressive on the outside ski, and perform the movements in a much more gentle way.
Having said that, once we get off-piste, we can combine any amount of a carve with a pivot to get the turn shape that we want and juice the most fun possible out of our day on the slopes.
History of carving
It all started with the advent of deep sidecut snowboards capable of carving arcs, in the 1990s. Yes, carving started with snowboards!

One of the first projects of a carving ski was developed by Jurij Franko and Pavel Skofic in the Slovenian factory Elan, in 1988. The first model launched to the market was the ELAN SCX (SCX stands for SideCut eXtreme”) in 1993.
Not long after that, the market shifted dramatically, with “old” skis piling up, unsalable even in clearance racks.

At almost about the same time than Franko, another Balkan racer named Ivan Petkov came to scene. Many of us will remember him as a local skiing legend and the “grandfather” of shaped skis. In 1993 Ivan co-founded S Ski, and led the innovative company to perfect some of the first wide shaped skis that led to a revolution in the faltering ski industry.
Ivan retired from the Bulgarian ski team in 1976 and took up windsurfing. He designed and built a line of “Bora” sailboards and won the national championships three times between 1977 and 1980. He came to the US in 1987, to spend the summer in Hood River and the winter teaching skiing in Aspen. By 1989 he was managing a surfing retail operation for in Hawaii, and while watching the craftsmen there carve custom sailboards, got the idea for a new carving ski. In the spring of 1992 he went back to the resort town of Pamporovo, in the Rhodope mountains of southern Bulgaria. There, Atomic had set up a factory to make some of their inexpensive constructions.
Petkov called his new product the S-Ski, for its turn shape. He applied for a patent on the geometry. He ordered more skis in 183 and 193cm lengths, and went to the SIA Trade Show in the spring of ’93. “Everyone came to the booth,” Petkov remembers. “Warren Witherell (author of How the Racers Ski) was very excited.” He shipped 300 pairs. The 183cm sample in the Colorado Ski Museum measures 115-61-85, for a 19.5 sidecut depth and a 15 meter radius.
For 1994, there were shorter lengths, 163 and 178cm, and Petkov sold 1200 pairs. S-Ski was on a roll, but Petkov was unhappy with Pamporovo’s quality, and opened negotiations with Blizzard to build his ski.
Read more at: https://skiinghistory.org/history/evolution-ski-shape/

Conclusion
Real skiing, the most thrilling and enjoyable one, is all about “carving”. But only 10% of all recreational skiers can actually carve a turn. So there is a lot of work for us, instructors, to help the other 90% experience those incredible feelings and sensations generated on the 100% edge locked “arc to arc” carved turns.
That’s what encourages me the most! To help skiers get to that level of enjoyment!
Some quotes…
“If you can’t carve, you’re not an expert. You might be able to flail your way down the steepest runs, but if you can’t set an edge, you’re not quite there yet.”
Steve Ikeda, PSIA
“Carving gives you maximum exhilaration with the least effort, and it allows skiers to achieve at a high level late in life. You might not be able to ski bumps into your 70s, but you will be able to carve”.
Paul Geoghegan PSIA
Keep ripping some arcs!
If you find this piece of information useful to improve your skiing, please support this website and help us to keep it up and create more content! A small donation really means a lot to us... Thank you so much!

Recent Comments